
Guide
ShutterPilot’s panel is Long Exposure in Properties > Camera, the camera’s green tab. Each camera keeps its own settings. You set how long the shutter stays open and how the moments become one picture, then click Render Long Exposure. Press F1 over any setting to open its section here.
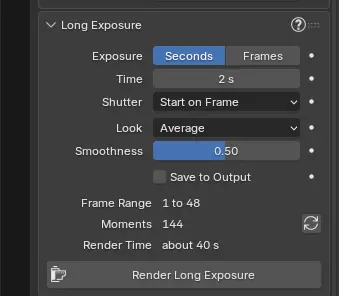
A long exposure is many renders of your scene, one for each moment the shutter is open, added up into one picture. ShutterPilot calls each of these renders a moment.
Exposure
Section titled “Exposure”Choose whether you set the time in Seconds or in Frames of the scene. Seconds follow the scene’s frame rate: at 24 fps, 2 s are 48 frames.
How long the shutter stays open, in seconds. A longer time smears moving things further and needs more moments. A car crossing the picture leaves a full trail at about the time it takes to cross.
Frames
Section titled “Frames”How long the shutter stays open, in frames of the scene. Use frames when the timing is set by your animation, such as one turn of a wheel.
Shutter
Section titled “Shutter”When the shutter opens, measured from the current frame.
- Start on Frame opens it at the current frame. The picture shows the current frame and the time after it.
- Center on Frame keeps it open as long before the current frame as after it, the way Blender’s motion blur does.
How the moments become one picture.
- Average counts every moment the same, as a camera does. Moving things blur and fade, and a person who walks through the picture turns into a ghost.
- Brightest draws moving lights as lines at full strength, as in a light-trail photo, and keeps the rest as in Average. In Cycles it denoises once at the end, so it costs about the same as Average.
- Stacked shows a set number of sharp copies of what moves, like a strobe photo.
Smoothness
Section titled “Smoothness”How smooth fast lights draw, for Average and Brightest. ShutterPilot measures how far things move on screen during the exposure and adds moments until copies of a moving light are at most 2 pixels apart at 0.50. Higher draws smoother lines and renders more moments, each with fewer samples, so the time stays about the same. Lower it when a scene with very fast motion takes too many moments. A run renders at most 1,024 moments; when the motion asks for more, the report says so.
Moments
Section titled “Moments”For Stacked: how many sharp copies the picture shows. Each copy is one render.
Save to Output
Section titled “Save to Output”Also saves the picture into the Output folder from Properties > Output, in its file format,
named after the camera and the frame, such as Camera_long_exposure_0001.png. The picture always
opens in the Image Editor too. If the save fails, you keep the picture and the report says why.
Frame Range, Moments and Render Time
Section titled “Frame Range, Moments and Render Time”Under the settings, the panel shows what the next run renders:
- Frame Range: the frames the shutter is open in, such as 1 to 48.
- Moments: how many renders the run takes. Before ShutterPilot has measured the motion it shows the least, such as “at least 48”. Click Count to measure it, in about a second.
- Render Time: how long the run takes, from the last run on this scene with the same engine and size.
Render Long Exposure
Section titled “Render Long Exposure”Renders every moment and opens the picture in the Image Editor, under the name Long Exposure. It is also in the Render menu at the top of the window.
While it runs, the status bar shows the moment and the time left. Esc stops the run and keeps the moments done so far in the picture. Ctrl+Z takes the picture back, and Ctrl+Shift+Z brings it back.
The button is greyed out, and its tooltip says why, when the scene has no camera, when this camera is not the scene’s camera, when the render engine is not Cycles or EEVEE, and while a long exposure is rendering.
Samples and noise
Section titled “Samples and noise”ShutterPilot shares your render samples over the moments, so a 2 s exposure costs about as much as one still with the same samples. Set the samples you would use for a still. In Cycles, the moments are one continuous sample sequence, and with Denoise on, the finished picture is denoised once.
Your compositor
Section titled “Your compositor”If your scene uses the compositor, it develops the finished picture once, the way a camera develops a photo. File Output nodes in your tree are left out of the moments, so they do not write a file for each one.
Your scene stays as it is
Section titled “Your scene stays as it is”After a run, the frame, the samples, the seed and the compositor are back as they were. Only the active view layer is rendered.
The ? menu
Section titled “The ? menu”The ? in the panel’s header opens Report a Problem, which sends what went wrong to Pilot Studio with the versions and settings, and Save Report, which saves the same as a zip to email. See Help.